By guest blogger Scott Mead
Professional photographer Scott Mead continues his series on capturing great images of your work, with lots of technical information on getting the right equipment and the right shot.
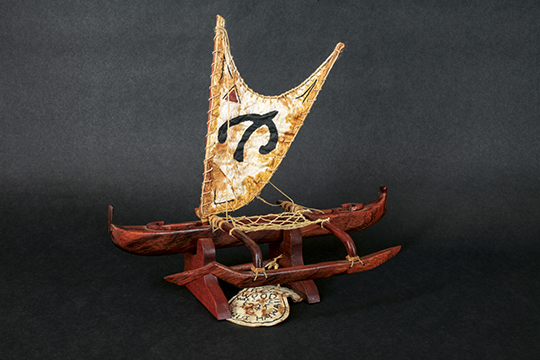
Properly lit and shot with good depth of field, this product shot of a Koa wood, Hawaiian War Canoe model shows the detail of the wood’s grain and the delicateness of the Tapa cloth sail, whetting the appetite of collectors.
As artists, we’re often asked by galleries or clients to send a picture of a piece for consideration or exhibition. That image is the first impression a gallery owner or juror has of you as an artist, and serves as their insight to you and your work. That photo is fundamentally your 50/50 chance to get your work seen and in front of potential clients.
Think about that for a second. Fifty-percent – essentially the flip of a coin – are not very good odds. But what if you could put the odds in your favor, say 70 or maybe even 80%? By taking the time to photograph your work with the right light, depth of field and properly posed, you can create images of your pieces that will leave an indelible impression to get your art noticed and remembered.
There are four pieces to the photographic puzzle: The camera, support, lighting and the stage.
Over the last five years, digital cameras have improved by leaps and bounds, with better-quality image sensors, faster processing engines and enhanced algorithms that take the information from a series of ones and zeros, and turn it into a photograph.
Contrary to popular belief, you don’t need a big, expensive camera to get great images of your art. You can get fantastic shots from the latest crop of point-and-shoot or mirrorless cameras, and even “bridge” cameras, which are a hybrid of a traditional digital single lens reflex (DSLR) and a point/shoot. Cameras with 8 megapixels (MP) will work, but you’ll get better results with 12 or more MP The vital aspect is setting up the camera to get the best image possible.
First off, we want to take the camera out of the “green” or “Program” mode, where the camera makes all of decisions. While these two settings will universally get you well-exposed scenic images outside, or great pictures of people, artwork (especially 3D pieces) can throw their little computers off. With that in mind, we want to tell the camera how to take the picture, and it’s easy to do: In the camera’s menu (or dial on top), change the shooting mode to “Aperture Priority” (or aperture value or A-Mode, depending on the camera).
Doing this allows us to tell the camera what we want our depth of field to be, while allowing the camera to choose the right shutter setting to make a good exposure. You’ll also want to set the camera’s ISO, or light sensitivity, to “100,” flash to “Off,” and Exposure Metering to “Center-weighted.” Now, set the self-timer to “10-seconds,” and make sure that the camera is set to record in its highest resolution jpeg. Set the camera aside for now.
One of the important parts of your home photo studio should be a good, sturdy tripod to mount the camera on. Why? Because as hard as we might try to hold a camera still, we can’t stop moving – our hearts are pumping blood, we’re breathing and our muscles never stop minutely twitching – so we need to have the camera on some sort of a platform that isn’t stirring.
Like easels, tripods come in a myriad of sizes, styles and materials, and in numerous price points. If you’re tempted by your photographer friends to purchase a state-of-the-art carbon fiber or basalt (yes, they now tripods from crushed lava rock), you’d be better served saving your hard-earned dollars and opt for a solid aluminum model, and here’s why: Aluminum tripods, while about two-to-three pounds heavier than their composite brethren, tend to last longer, take more abuse, dissipate vibration better and (this is the main consideration) usually cost hundreds of dollars less.
Along with the tripod, you’ll also need a “head” to mount the camera on, which also allows you to move and fix the camera in a variety of positions. I usually suggest purchasing a matching tripod/head kit, as they’re designed to work together, and usually the cost of the kit is lower than buying each separately.
Lately, manufacturers have been developing compact travel tripods, which are excellent in a studio setting as well as vacation friendly. Manfrotto’s Befree holds up to a nine-pound camera, and comes with a ball head and camera quick release. The great aspect of this unit is that it folds down to a mere 15-3/4” so it fits easily into a backpack or carry-on bag. So for less than $200, you get a fantastic multi-tasker.
Lighting is what makes or breaks an image, so it’s critical to properly illuminate your art and make it look enticing. You don’t want people to “want” your work, you want them “need to have it!” The type and size of light you’ll need mostly depends on the size of your art.
For jewelry, a small setup with two lights and diffusers (or a tabletop soft box) works wonderfully. For larger pieces and 3D items, you can easily illuminate them with ordinary items found at your home improvement outlet: Start on the lighting aisle, and pick up a couple of 24” florescent light fixtures if your pieces are 20” or shorter or 48” fixtures if your work is larger.
Next, point your shopping cart down to the bulbs, find the corresponding tube size, and look at the packaging. Florescent lighting comes in three Kelvin color temperature types: Natural, or Daylight (5,000K), Cool White (4,200K) and Warm White (2,800K). You’ll want 5,000K, or Natural bulbs, and here’s why: Printers, graphic designers and gicleè houses calibrate their monitors and machines to a 5,000K industry standard.
Think of color temperature as a language – If you have a person from Germany, another from America and a third from China speaking in their native tongues, they probably wouldn’t understand each other. But if they all spoke a common language, communication would be easily accomplished, and we’d know exactly what each other is saying. So if we use 5,000K color temperature bulbs, set the camera’s white balance to correspond, and your printer has calibrated his machine to the same value, your pictures will print accurately.
What you photograph your art on may not seem that important, but there’s a reason why it’s called a “stage,” as it truly sets the stage or tone of your work. Your background can be a simple piece of black craft paper, organic material such as a banana leaf or a slab of wood, or a section of fabric. There’s one question you have to ask yourself when selecting your backdrop: Does it detract or enhance my art?
Many a time, I’ve seen necklaces placed on a wet piece of granite or a patch of fall-color leaves. The photos are beautiful, but distracting to the eye (especially when the entire image is sharply focused). At a recent workshop, I was demonstrating background and lighting techniques to a glass artist. He had brought a dramatic reddish-orange blown piece with multiple facets and openings. We placed the piece on an all-white stage, and while it looked clean and neat, it looked lost and lacked visual impact.
Switching to a velvet black backdrop, the glass immediately leapt towards the camera and viewer’s eye – it was no longer glass floating in a snow storm, but a dramatic work of art, waiting to be snatched by a collector. Remember that your art is the star, and the background is supporting actor – it’s supposed to make your art look good. If it doesn’t, change it.
Next week, we’ll wrap everything together, and I’ll show you how to take images that make your work memorable and drive sales.
Don’t miss Scott Mead’s first article in this series, “The Importance of the Picture”


Wonderful piece of article you have posted here, it will really help me to learn more about photography as i am running a photography blog. i will definitely read your article in which you will let us know “how to take images that make my work memorable”. Please share this kind of article again, would be grateful !