by guest blogger Kelly Heck
As an artist connecting directly with your public, you need photographs of yourself for marketing purposes. Use these tips from professional photographer Kelly Heck to look your very best, in an excerpt from Artsy Shark’s newest e-course, Sell More Art with a Dynamic Portfolio.
In today’s digital driven world, photo and video marketing is everything! Establishing a feeling of connection between yourself and your customer isn’t limited to your backyard anymore. Your audience is limitless… if you take advantage of the opportunity sitting at your feet. But many hesitate to put themselves out there. I advise that the best way to get over your distaste in being photographed, appearing in photos, or putting photos of you out there – is to practice the art of being photographed.
As artist entrepreneurs, why do we need photos taken in the first place? There are many reasons: press use, website content, print marketing, social media, signage, teaching/speaking opportunities, and the list goes on. Marketing is so much more engaging when photos (and video) are tied in. What kind of photos might an artist entrepreneur need, you ask? Portraits (headshots, environmental portraiture, etc.), candids, behind-the-scenes, and in-progress photos that show a work as it develops from design to completion. Additionally, you will need portfolio shots, detail shots of your artwork, in situ photos and images of your workspace (including your studio and your tools/materials).
You can breathe a sigh of relief, because not every photo has to have you in it. But for the photographs we appear in, every person wants to look their very best. Let’s touch on some guidelines for this. There are six factors that I believe are vital to looking your best in portraits:
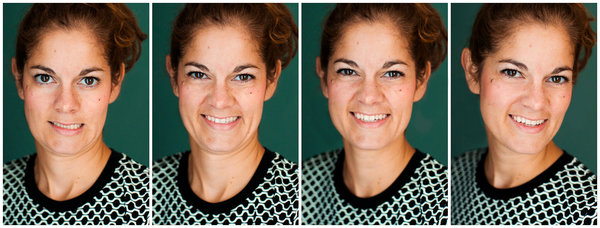
Genuine Smile
“CHEESE” is the worst thing you can say to flash a fake smile. Instead, say “MONEEEEEEY” or give a little giggle.
Head Positioning
Push your face forward towards the camera. If you are square to the camera, that means you will push your nose forward as if there is a string on the tip of your nose and you are being pulled towards the camera. If you are on an angle or profile position, push your camera-side cheekbone towards camera. These techniques lengthen, stretch loose skin, and help to define your jawline.
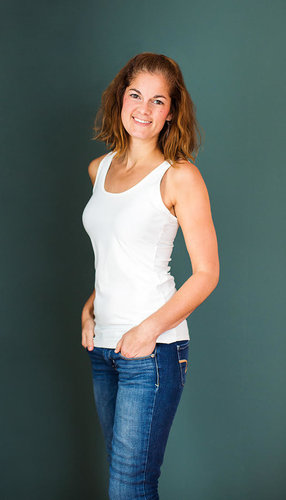
Body Positioning
For an instant no-surgery tummy tuck, make use of twisting your body back towards the camera, with your feet about 45 to 90 degrees away. Add a little extra lift and energy to your posture by pulling your shoulders back to pinch your shoulder blades.
Finding Beautiful Light
In photography, everything is about light. Find and face directional soft bounce light. Here’s an outdoor example: If it’s a bright sunny day, but you can find some shade next to a big parking lot, make use of the sunlight bouncing off the pavement by facing the parking lot either straight on or on a slight angle to ensure the light falls across your face. An indoor example: Face a window (think “Rembrandt lighting”) or use an external flash to bounce light off a white ceiling or wall.
What to Wear
To make your best outfit choices, open your closet and follow these four filtering factors:
- Clothing pieces that make you feel amazing
- Properly sized, form-fitted pieces
- Solid colors and simple patterns
- Medium & dark tones, neutral, and jewel tones
The rules can always be broken, but this is a safe starting point for a timeless style.
Angles & Perspective
The position between you and the camera can dramatically affect your results. Do you want to appear powerful? Be photographed from an angle below eye-level. Do you want to appear gentle? Be photographed from above eye-level. Perspective can be tricky. Technically 85mm is the most flattering “distance” or lens length for portraiture, but it is subjective. Keep in mind that the closer your camera and the more wide angle your lens (like when taking selfies with a camera phone), your facial features are skewed, giving you a bigger nose, and smaller ears. The further away you get (more distance or a longer lens… think zoomed in or telephoto), your proportions are a bit more true-to-eye.
Now that you know these tips, practice what you know:
- Phone a friend who also needs this, and go on a photo adventure, or occasionally trade time.
- Stand in front of a mirror and practice your smile and head & body positioning techniques.
- Ask your spouse or partner to take some pictures for you.
- Ask your kids to take pictures for you.
- Hire (or barter with) a personal branding photographer.
- Use your camera on the timer setting and take your own portraits.
- Look up influencers and see what they are doing for inspiration.
- Get lost in the rabbit-hole of Pinterest collecting ideas.


Speak Your Mind