Guest blogger Garry McMichael explains common mistakes, and helps make photographing art with a digital camera easy.
With online galleries and social media as major sources for artists to promote and sell their art today, artists need quality photography more than ever. Modern digital “point-and-shoot” cameras are a miracle of technology. They automatically focus, set the exposure, easily zoom in and out, and most of the time they give you great color photographs.
Best of all, you can see an immediate preview of the photo and if necessary make adjustments. But digital cameras are not perfect. If you want quality photographs of your art, expect to invest a little time learning how to use your digital camera effectively.
Here are seven mistakes artists make photographing their art, and what you can do to correct them. These are simple mistakes to correct, but uncorrected they can keep you out of galleries, exhibits and art fairs. Most important, poor photography will keep your art from selling.
1. One of the simplest mistakes artists make photographing their art is failing to align themselves straight-on with the artwork, thus distorting the shape of the art. Have you ever tried taking a photo of a building only to have the building look like it’s leaning backwards? That’s a perspective problem known as keystoning, and it’s caused by the building and the camera lens being on two different angles. You get the same effect when photographing artwork if you are off to the side, above or below the painting.
Any time you photograph a painting, you should center yourself so the camera is centered in the middle of the painting. The camera lens needs to be at the same angle as the art. When you are off to the side or shooting up or down, the artwork will be distorted. Another source of image distortion comes from using the wide-angle end of your zoom lens. Set the camera in the middle of the zoom range to minimize lens distortion.
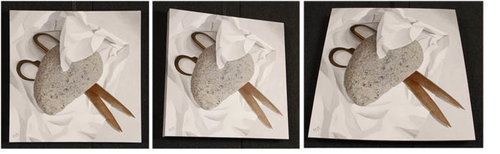
Off Center Photo Distortions: Examples of the effect you get if the camera is not directly centered with the art. Left image is correctly centered. The middle image the camera is off to the side and in the right image the camera is shooting us at the painting. The right image was also taken with the zoom set to wide angle and you can see how the edges of the art are curved.
2. While you are correcting for the distortion, make sure you fill the frame with the artwork. Taking a tiny photograph of the art gives you a low-resolution image that needs to be cropped before using. By cropping, you are limiting the size the image can be reproduced.
With a zoom lens on a DSLR it is pretty easy to fill the frame, because you can precisely adjust the zoom until the frame is filled. With “point-and-shoot” cameras it’s a little more difficult. The built in motorized zooms never stop exactly where you want. I suggest you select a focal length in the middle of your zoom range, then physically move your camera closer or further away from the art until you filled the frame. For both consistent alignment and filling the frame, a steady tripod will make the job easier.
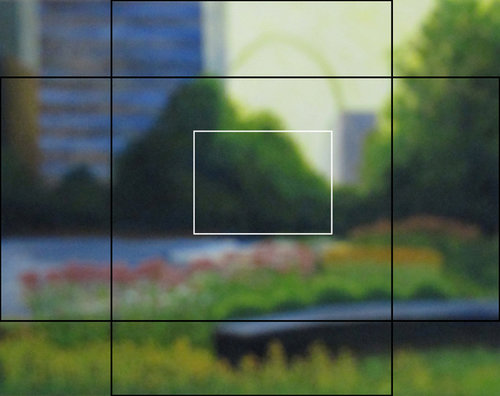
Out of Focus Photo Issues: Here is a view of the LCD Viewfinder on a digital point and shoot camera the little square in the middle is where the camera is focusing. You need something of contrast in this area for the camera auto focus to work correctly.
3. Blurred and out of focus images will make your photographs unusable. No one will look at images that are not sharp. There are two causes of out of focus photographs; failure to hold the camera steady and the camera can’t focus on the artwork.
Taking photographs with point and shoot cameras under low light conditions, such as indoors, is especially difficult. This problem is easily resolved by using a tripod. If you want sharp photos, make a modest investment in a tripod to avoid camera blur and improve your ability to fill the frame and properly align the image.
4. The problem with the “point-and-shoot” cameras failure to focus properly is a little more difficult to resolve. Auto focus systems make it much easier to get sharp photographs, but when it comes to photographing 2D flat art sometimes the autofocus does not work very well.
The problem is auto focus cameras need something of contrast in the image to figure out where to focus. In many of the “point and shoot” cameras the camera only focuses in a small square area in the center of the viewfinder. If you happen to have a solid color or your art is “dreamy”, soft or foggy your camera’s auto focus system may not work. It will just whirl back and forth looking for something to focus on.
You could switch to manual focus, but the small LED screens on the cameras it is almost impossible to manually focus. Look for something of contrast in the painting to focus on. Once it is in focus, re-center the artwork in the frame and take the photograph. Since the focus systems work differently on different camera brands it’s a good idea to review the instructions in your camera’s user manual. They may offer better techniques to focus on works of art.

Glare on an Oil Painting Photo: This photograph was taken outside and you can see glare caused by the sky reflecting in the shiny surface of the oil painting.
5. Sometimes you can’t see the artwork because of glare and reflections. These are caused by photographing the art when it is framed behind glass, or when the painting has a glossy varnish. Highly textured oil and acrylic paintings with a glossy varnish are especially prone to having severe glare and reflection problems.
If you work with oil or acrylics, make sure to photograph your art before you add a glossy varnish. If you work in pastels or watercolor, then photograph the artwork before you place it behind protective glass. If you are using lights to take your photographs, make sure the lights are at a 45º angle to the camera so they don’t reflect back into the camera lens (see diagram 1).
Avoid on camera flash. The flash is much too close to the lens and most of the time the flash reflects directly back into the lens or causes hot spots on the art work.
6. About 80% of the time you photograph your art the exposure will be perfect, but with automatic exposure cameras dark (low key) paintings can come out looking too light or light (high key) art can look too dark. This happens because the camera’s automatic exposure system is designed for average (middle range) values and the electronics is trying to compensate for the too dark or too light artwork.
Even the simplest point-and-shoot cameras offer easy ways to make corrections. It’s a system called “Exposure Compensation.” Look for the “+/- button” on your camera which is used to override the camera’s auto exposure system. The +/- button works differently on different camera brands and sometimes it is hard to find.
Read the instructions that come with the camera to learn how “exposure compensation” works. But there’s good news, because using exposure compensation is easy to learn and once you have used it a few times you will find it an easy adjustment to make.
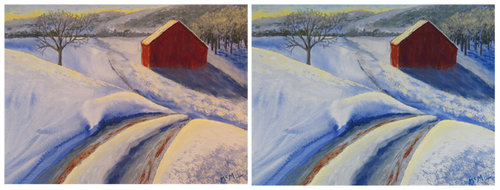
Mixed Lighting Photo: The image on the left was photographed with a mixture of both incandescent and daylight lighting. One side is warmer and the other side is cooler. The right image the photograph was taken with just daylight. The camera was est on Auto White Balance (AWB).
7. Another major problem in photographing of your art is the lighting can look uneven or off color. When it comes to natural looking lighting you can’t beat Auto White Balance (AWB) for improving the accuracy of the colors in your paintings.
But AWB isn’t perfect, especially if you are taking photos in a location that has more than one light source that gives you “mixed” lighting. A good example is taking photos in a room with both incandescent lighting and strong daylight coming through the windows. Your digital camera becomes confused and doesn’t know whether to balance for the warm incandescent or the cool daylight.
Make sure you use only one light source, incandescent or daylight, and let the AWB do its job. For indoor photography I use a couple of daylight balanced (5000K) CFL light bulbs in inexpensive shop lamps to photograph paintings. You can buy the CFL bulbs and light fixtures for under $40 at any Home Depot or Lowes.
If your art is not evenly lit, it’s probably because all the light is coming from one direction and isn’t falling evenly on the art. This is especially obvious on large paintings. You may need to find a location where the lighting is even. Outdoors in the shade or indoors with even north light are two good choices. If you go outdoors, watch out for reflections and glare caused by blue sky or objects behind the camera. I like to use two lights equally spaced on both sides of the camera and at 45º to the art to achieve even light without reflections (see diagram 1).
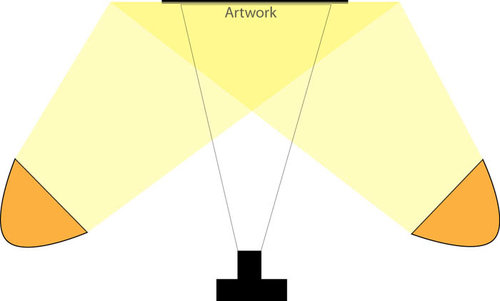
Artwork Lighting Diagram 1. A good setup for photographing art. The camera is directly in front and centered with the artwork. A pair of lights are used, equally spaced from the art and at 45º to the art to avoid reflections.
You have spent a great deal of time learning how to make great art, and it will take you a little time to learn how to photograph the art. But don’t skimp. It will make a big difference in how professional you look and have a big influence on your future sales.
 Garry McMichael is a commercial photographer and painter located in St Louis, Missouri. A couple times a year he teaches one-day workshops on how to photograph 2D and 3D art. For more information on upcoming workshops visit his website.


At last – an easy-to-understand “how-to” for artists on photographing their own work. Thank you for sharing this wonderful information!!
This is nicely detailed and accurate. Ideal for those artists with limited resources, or non-professionals needing to use whatever they have to get reasonably good photographs. Garry McMichael writes very clearly and helpfully.
Thanks Ed and JJ. I’l start working on a article about photographing 3D art.
Thank you, It was easy to understand and clear.
I’m always struggling when it’s time to take good picture, specially with the light.
Now I know what to buy and where to installe them.
Garry thank you man for this advice.
nice article. I find it best to photograph the flat art outside with the art at a 45 degree angle in the shade. Not direct sunlight at all. In the shade, it still brings in enough light but the light is even and there is no glare at that angle. My main concern is making sure the focus is even throughout the whole painting. Not more focused on one part of it. Any suggestions regarding this would be appreciated. I use a DSLR Canon Rebel with autofocus and the kit 50mm lens. Thank you.
Excellent article, thank you so much!
What’s the best camera for art that is going to be sold as a print? Needs to meet pixal requirements
Hi well thanks that helped to understand all the shadows I create when I take a photo
Hello. Easy to understand and to the point. With AWB it may be useful to mention that many cameras can have white balance adjusted and set for the shoot by the use of white ‘tuning’ cards. This was very useful for me in a gallery with mixed lighting. (Some post processing work always seems necessary, particularly in eliminating shadows.)
Cheers.
Thank you, photographing my work is often challenging. I have found I get the best results from photographing my work outside on the patio in the shade.
This article was indeed very helpful to me so when I’m in the middle of a project I can refer back to and see what my mistakes were.
Great article, but I’m wondering if the art lighting diagram would reduce glare if painting is already varnished?